
I thought I would offer a bit of a behind the scenes look at reupholstering this thrift store chair. I had not done a big project like this in some time, it reminded me that I really enjoy reupholstering pieces and that it takes quite a bit of time.
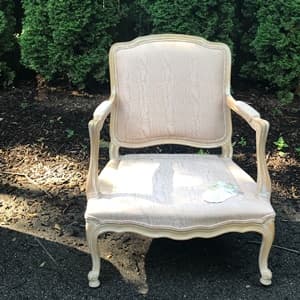
Here is a picture of how I found the chair although it did come with a seat cushion. I am not entirely sure why I didn’t include it in the photograph, I took it several months ago and that is too long ago for my memory to recall such details :). Although I do remember shopping at the thrift store when this was brought out onto the floor by one of the workers and staking my claim on it as quick as possible. There is nothing like thrift shopping to bring out my most assertive self. I was drawn to its shape and upon inspection I found it to be very sturdy. I am often tempted in second hand projects that aren’t particularly sturdy, but they can be more trouble than they are worth. There are lots and lots of potential projects out there, you can find a sturdy one, it will be worth the wait.
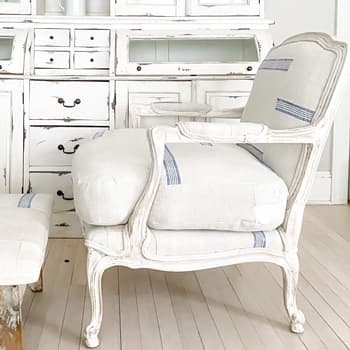
This chair sat in my basement for a while, like nearly 2 years. So in my head it went through a variety of plans. I actually sanded down the finish a couple months ago and sealed with wax. It was a nice finish, but when I finally decided upon using this vintage hemp mattress cover that I purchased from the shop, Parna, I thought it needed to be painted white. I painted the wood two coats of Miss Mustard Seed Milk Paint Linen after a light sanding, I sealed it with a layer of tough coat.
To avoid reinventing the DIY wheel I am going to direct you to Miss Mustard Seed’s blog that inspired and taught me how to reupholster a French Style chair, . She offers a great detailed tutorial if this is a project you would like to tackle. AND YOU CAN TACKLE IT!!!
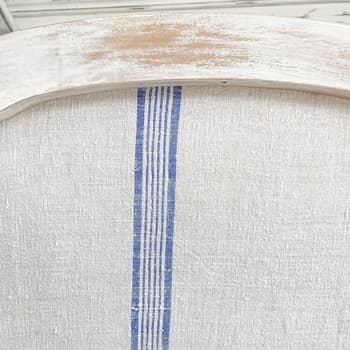
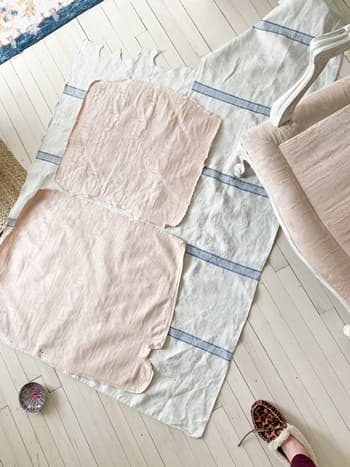
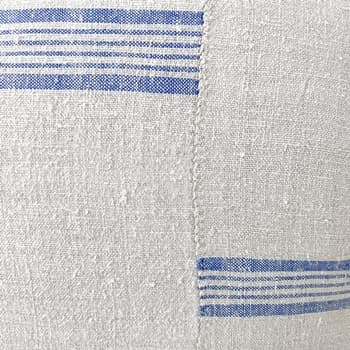
For this project I was so glad that the fabric that I stripped from the chair remained intact so I could use it as a pattern. It is generally good practice to always do this, but in this case it especillay helped me line up the stripes and stitching just so. On a side note something very special about this kind of vintage fabric is the hand stitching. In my work I like to celebrate time and person who carefully did these quality stitches that have lasted decades. It adds so much meaning to these beautiful textiles, I often wonder who this seamstress they might be? And in what setting did work? I wanted these stitches found running down the front of the chair and lining it up worked out great with a pattern.
Next I like to tack up my pieces of fabric to get a visual on placement before I reach the staple gun level of commitment.
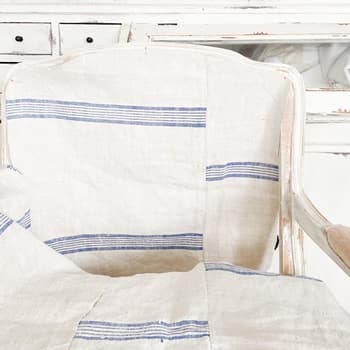
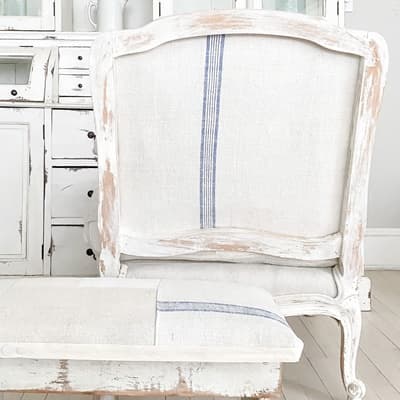
Here I am happily working on the back of the chair:
*note all the visitors I have wondering about dinner. I had hoped they might forget, but they never do.*
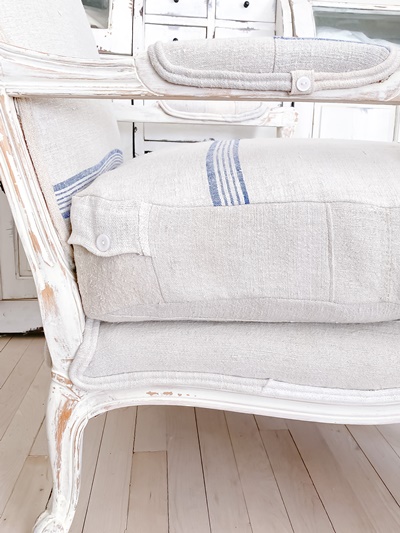
After the back of the chair was done I took on the cushion cover. Cushion covers have given me the most headaches in reupholstery. It has taken me a lot of practice to get somewhat efficient and confident in sewing them. I have even hired a sewing instructor TWICE to work along side me to give me pointers. However I totally think I beginner can sew one. Absolutely. There just could possibly be a bit more moments of frustration, at least that was my experience. But if you are mentally prepared for frustration, hiccups often don’t turn into frustration. So by all means beginners go for it! My first cushions turned out fine in the end, but it took A LOT of patience. I am not trying to be a downer or discourage anyone, quite the opposite. I just don’t want to romanticize the process so that if someone tries this out and it doesn’t turn out the first time they know they are not alone. This is a really good tutorial done by Peg Baker and she is very precise, maybe I would have had more luck when starting out if I had followed a her tutorial. In her tutorial she uses piping, for the deisgn of this cushion I liked it without piping. Also she teaches how to put a zipper closure, I like buttons and use those instead. The buttons take a bit more time, and more fabric is needed for the overlap but it is worth it for me. Also I have found an important step in making a cushion with this hemp linen is adding a bit of padding. I really like a full looking cushion and the woven fabric has a lot of stretch to it, I always end up adding a layer or two of dacron. This cushion was already very full, but it needed a little more padding. I cut a piece that was just about half the size of the top of the cushion and then I cut a piece to the exact size of the entire top of the cushion. I put both pieces in place on top of the cushion with the smallest one under the larger one. I like the bit of cozy fullness it added to the seat.
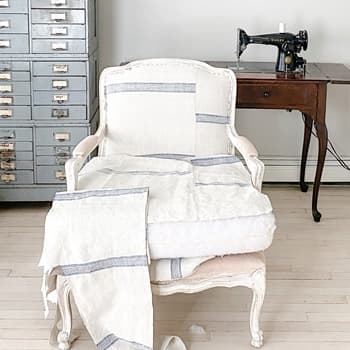
When I put the cushion back on is when I had my ahhhhhh moment, the chair was starting to come together. It takes a while to get to this point with upholstery, but it is so sweet and worth the wait to feel like your vision is coming to life. Also you may notice on the bottom left there is a stripe that I patched in. I felt like it needed one more stripe and that is the beauty of this pieced togther look of the fabric is that it gives freedom to add patches.
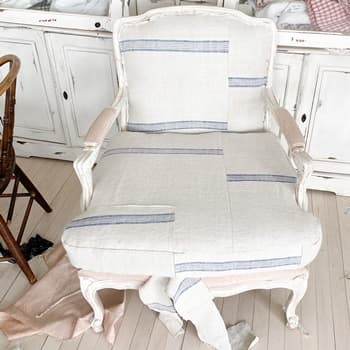
Next up was the bottom of the seat. I used modern canvas for the part of the seat that would be covered by the cushion, this is fairly typical, but also I needed to because I was running out of the vintage hemp fabric. To be honest here, this part took me the better part of a day. It is tricky because you have to make cuts to fit around the legs and arms of the chair so that the fabric is smoothed down in place, but you can’t cut too much then you are left with too little fabric. In someplaces the trim can help cover some small spaces in the fabric, eventhough it is just a half an inch it can make all the difference. I am glad that I took my time with this seat, in the end it turned out well.

When I put the cushion back on is when I had my ahhhhhh moment, the chair was starting to come together. It takes a while to get to this point with upholstery, but it is so sweet and worth the wait to feel like your vision is coming to life. Also you may notice on the bottom left there is a stripe that I patched in. I felt like it needed one more stripe and that is the beauty of this pieced togther look of the fabric is that it gives freedom to add patches.
Next up was the bottom of the seat. I used modern canvas for the part of the seat that would be covered by the cushion, this is fairly typical, but also I needed to because I was running out of the vintage hemp fabric. To be honest here, this part took me the better part of a day. It is tricky because you have to make cuts to fit around the legs and arms of the chair so that the fabric is smoothed down in place, but you can’t cut too much then you are left with too little fabric. In someplaces the trim can help cover some small spaces in the fabric, eventhough it is just a half an inch it can make all the difference. I am glad that I took my time with this seat, in the end it turned out well.
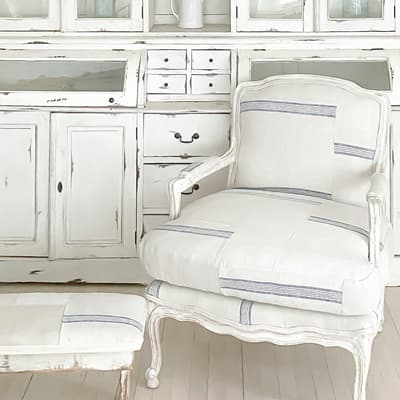
The last parts to the chair left were the fabric for the arms and the trim. Picking the right trim can stress me out. It can a make or break part of the entire piece. I feel like sometimes its hard to find a trim that looks like it belongs with the fabric and doesn’t overpower or detract from it. For this chair I wanted it to blend, and in order to get the color just right I need to make my own with the same fabric. I made my own double welting. And here is yet another tutorial that I did not write, thank you Miss Mustard Seed. Then I secured the trim with a glue gun. I used a small piece of fabric to glue into place where the ends met, I tried to place these parts in inconspicious areas. On the arms where it was visiable I added a button, because why not?
And she DONE and avaliable for purchase with local Milwaukee pick up. All the details are on the shop page.
For quick reference here is a list of the tools I use:
T50 Staples I like to have a couple different sizes handy, I often start with the smaller ones so I can remove them if needed and adjust things. Then when I am ready to commit, I bring out the larger ones. Be sure you get the right kind of staple for your staple gun.
Please let me know if you have any questions or success stories, my email is pennyandivydecor@gmail.com.

*Disclosure: This post contains affiliate links at no additional cost to you.*